Friday, December 30, 2011

Lemon Lime Mini Berry Tarts

These mini desserts are the perfect addition for your next dinner party. The below recipe makes 45 mini berry tarts and only takes 20 minutes in total to make. You can make the custard the day before so that they are all ready to go the day of the party. This year I am making these tarts for New Year's Eve.

Ingredients
  • eggs
  • 3/4 cup sugar
  • teaspoon rum flavoring- can be found in baking aisle 
  • 1/4 cup fresh lime juice
  • 1/4 cup fresh lemon juice
  • packages prepared phyllo cups (45 cups total)- Can be found either frozen or not. If frozen, defrost before filling.
  • 1 1/2 cups fresh raspberries and or blueberries (45 total)
  • Coconut flakes


In a small saucepan, whisk eggs, sugar, rum flavoring and both juices. Cook over medium heat, whisking constantly, just until boiling and mixture is thickened, about 10 minutes (mixture should register 160 F on instant-read thermometer). Strain lemon-lime curd into bowl; cover surface with plastic wrap; refrigerate 2 hours or until chilled. Can be made a day ahead.
To serve, spoon 1-1/2 teaspoons curd into each phyllo cup; top with a raspberry or blueberry and a pinch of coconut. Serve immediately or refrigerate up to 4 hours.

The picture & recipe was derived in part from Family Circle. 

Wednesday, December 28, 2011

Cranberry Jello Salad

Looking for the perfect addition to Christmas dinner and need a break from the traditional jellied cranberry sauce this holiday season? If so, this cranberry jello salad is just the solution. This recipe was given to me by B's mom Patti and it was a hit at our last Christmas dinner.


Ingredients
1 package raw cranberries
2 oranges
1 3/4 cups sugar
1 tablespoon clear gelatin
1 small package cherry jello
1 cup finely chopped celery
1 cup finely chopped apples
½ cup chopped walnuts 

Wash cranberries and grind in a food processor. Peel one orange. Add the peeled orange into the food processor. Squeeze the juice from second orange into the food processor. Grind oranges and cranberries until well mixed. Pour into a bowl. Add sugar into the bowl and let mixture set for 2 hours. In a separate bowl, mix gelatin with ¼ cup cold water. Let sit for 5 minutes. In a separate bowl, mix 1 cup boiling water with the package of cherry jello. Combine the gelatin mixture and the jello mixture. Add the gelatin and jello mixture to the fruit mixture, stirring until well combined. Add in celery, apples and nuts and stir until well combined. Put into a pam sprayed jello mold, cover and refrigerate overnight. Enjoy!

Thursday, December 1, 2011

Christmas Sugar Cookies

Throughout my childhood, the first of December meant making holiday goodies. My sisters and mom gathered around the kitchen for hours and baked every sweet imaginable. This year we are all in different cities and states but my mom still wanted to continue on with the tradition. As a result, we are each baking goodies and traveling many hours home this weekend. Once we are home we will engage in our "Holiday Swap". My contribution will be sugar cookies. This recipe has been in my family for as long as I can remember and turns out perfect and delicious year after year. This recipe yields around 3 dozen sugar cookies.


Ingredients:
1 cup butter, at room temperature                   
1 cup sugar
¼ cup whole milk                                                
1 egg
1 tsp. vanilla                                                
3 cup all purpose flour
½ tsp. baking powder

Directions:
Combine butter and sugar in large mixer bowl.  Beat at medium speed, scraping the bowl often, until creamy.  Add the milk, egg, and vanilla.  Continue mixing.  Reduce speed to low.  Add flour and baking powder; beat until well mixed.  Cover; refrigerate until firm (1 hr.) Heat oven to 375 degrees.  Roll out dough on lightly floured surface.  Cut out cookies and place on cookie sheets lined with parchment paper.  Bake 5-8 minutes or until edges are browned.  Cool completely then frost with Powdered Sugar Glaze.

Powdered Sugar Glaze

Ingredients:
2 ½ cup powdered sugar                     
 5 Tb. water
1 Tb. light corn syrup                                                                                                                                1 Tb. Butter
½ tsp. almond extract                                                                                                                         food coloring

Directions:
Combine all ingredients in small bowl – mix at medium speed until powdered sugar is moistened. Tint with food coloring if desired and frost the cookies. Let stand until frosting hardens.  Can be stored in freezer with wax paper between the layers. Enjoy!

Sunday, November 20, 2011

Grand Marnier Crème Brûlée

This Grand Marnier creme brulee is the perfect dessert to serve to guests and takes very little prep time. MIx up this dessert when you get home from work and they will be ready when the guests arrive. 


Special Equipment
Cooking Torch 
6 Creme Brulee dishes

Ingredients
6 large egg yolks
7 tablespoons sugar
2 1/4 cups whipping cream
2 tablespoons Grand Marnier
2 teaspoons vanilla extract
3 tablespoons brown sugar

Preheat oven to 325°F. Whisk yolks and 7 tablespoons sugar in medium bowl for about 2 minutes. Bring cream to simmer in heavy small saucepan. Gradually whisk hot cream into yolk mixture. Whisk in Grand Marnier and vanilla; divide custard into 6 creme brulee dishes. Arrange cups into two metal pans. Pour enough hot water into pan to come halfway up sides of cups. Bake custards until gently set in center, about 25 minutes. Remove cups from water and refrigerate uncovered until cold, at least 3 hours. These can be made a day in advance. 

When ready to serve, sprinkle 1/2 tablespoon of brown sugar onto each. Use cooking torch on each dish until top is caramelized and starts to change color. If you do not have a torch you can simple place dishes on a baking sheet and broil for about 2 minutes. 


The creme brulee on the right is before using the torch. The one on the left is ready to be served! Enjoy!


Wednesday, October 26, 2011

Individual Summer Berry Tarts with Apricot Glaze

This is my go to dessert recipe when I am having guests over for dinner. You can do parts of the recipe the day before (dough, cream, & tart shells) and finalize just before your guests arrive. While this recipe might seem a bit daunting at first, it is well worth it. 
Serves 5-6 


Step 1: Dough
Ingredients:
1/ 2 cup sugar
2 sticks softened, unsalted butter
1 large egg
1 1/2 tsp pure vanilla extract
1/2 tsp salt
zest of 1 lemon
1 1/2 all-purpose flour
Before you begin, make sure all of your ingredients are at room temperature. Add the sugar to the butter. Using a wooden spoon or a spatula, combine the two until they are just blended together.
In a separate bowl, combine the egg, vanilla, salt and the zest of one lemon. Beat with a fork to blend everything together. Add this mixture to the sugar and butter. Mix again until evenly combined, scraping down the sides of the bowl from time to time.
Next, add all of the flour in at once and fold in until it’s just incorporated. 
Once the flour has been incorporated, gather the dough together in the bowl and place onto the countertop.
Knead the dough briefly by rubbing it to ensure the flour is fully covered with the fat from the butter. Do this just a few times. Bring the dough together and cut it into 2 equal pieces. Shape them into flat rectangles. Wrap each piece tightly with plastic wrap. Press each piece to flatten slightly to even out. Place onto a tray and into the refrigerator for a minimum of 30 minutes to chill.

Step 2: Pastry Cream 
Ingredients:
4 large egg yolks
1/2 cup sugar
5 tbsp cornstarch
1 tsp pure vanilla extract
2 cups whole milk
1 pinch salt
To start the pastry cream combine the egg yolks and sugar using a whisk. Then add the cornstarch and whisk until well blended (about 2 minutes) until light in color.
Heat the milk, vanilla and salt over medium heat and bring just to the boiling point. Add a bit of the milk at first to temper the eggs, and then continue to whisk and add the milk bit by bit until fully incorporated.
Transfer the mixture back into a clean pot over medium-low heat. At this point, it’s important to whisk constantly, until it thickens and bubbles. Make sure to get the whisk right into the edges of the pot so everything cooks evenly and the bottom doesn’t scorch.
Once the mixture has clearly thickened and has started to bubble, whisk continuously for about another minute to cook out the cornstarch. Pour the pastry cream into a bowl and place over an ice bath to cool. Stir a few times to quickly bring down the temperature. Once cooled a bit, cover the surface of the pastry cream with plastic wrap to prevent a skin from forming.
Transfer to the refrigerator to chill completely. 


Step 3: Preparing the Tart Shells
To roll the dough, lightly dust the counter and rolling pin with flour. If you find that the dough is cracking as you begin to roll it out, it may be too cold. Just allow it to sit at room temperature for a few minutes and then continue.
To prevent the dough from sticking to the counter, gently lift it and turn it slightly after every couple of rolls. Dust lightly with flour if anything sticks.
Work quickly so the dough doesn’t get too warm. Roll it out to about 1/8" of an inch thick. At any point, if you find the dough is getting too warm or it is too soft to work with, place it onto the back of a floured baking sheet and chill in the refrigerator until it is easier to work with.
Place the tart shells onto the dough and cut around, leaving about an inch or so.
Remove the tart shells and the excess dough. The leftover dough can just be pushed back together and used for another time.

Gently lift the dough and place it into one of the tart shells. Note: don’t worry if any tears occur - you can simply press the dough together. Press the dough into the base and along the sides. Pinch the dough over the edge of the tart pan to form a thicker wall. Then gently squeeze the dough along the edge so it rises a bit above the edge of the tart shell. This is a great trick in case the dough shrinks at all during baking. Press the pieces of excess dough together and freeze for future use.
Place the shell onto a tray and into the freezer or refrigerator while you assemble the remaining tarts. Once all of the tarts are assembled, poke the base of the dough a few times with a fork.  
Place back into the refrigerator for at least 20 minutes to ensure the dough is very cold prior to baking.


Step 4: Baking the Tart Shells
While the dough is chilling, preheat the oven to 375 degrees.
To blind bake the tart shells, remove them from the refrigerator and place a small piece of parchment inside each one. Then fill with dried baking beans or pie weights.
Flatten the beans slightly to ensure the base and sides are weighed down. Then place the tart shells into the oven and bake for about 13 to 15 minutes or until you can see the edges just start to turn golden.

Once the shells have started to set, remove the beans. The dough should look like it has started to cook and set and the edges should also look a bit golden. Place back into the oven and continue to bake for another 5 to 10 minutes or until cooked through and golden brown.
For even browning, you can rotate the tray during baking. Also, if the edges seem to be getting too dark, yet the base still looks undercooked, place a piece of parchment over top. The parchment will slow any further browning while giving the bottom time to fully cook.
Once done, the edges should be golden brown and the base should be fully cooked. Place onto a rack to cool completely.


Step 5: Preparing the Fruit
While the tart shells are cooling, begin preparing the fruit. Use only fresh fruit.  Note: the better quality the fruit, the better your tart will look and taste.
Wash the fruit just before assembling and make sure to handle it gently. Rinse very gently in a colander and then place onto a plate lined with paper towels to drain.
For the raspberries, make sure any water trapped inside is allowed to drain, as any excess water will lead to a soggy tart. Also be sure to remove any stems from the blueberries. If using smaller, wild strawberries, you can leave the stems on as they are soft enough to eat. This just makes for nicer presentation, but you can remove them if you prefer.


Step 6: Assembling the Tarts
Ingredients:
1 cup fresh strawberries (approx.)
1 cup fresh blueberries (approx.)
1 cup fresh raspberries (approx.)
You can also use kiwi if you prefer, which is what is shown in the above picture. 

To begin assembling the tarts, whisk the pastry cream well to smooth it out. It may be hard to whisk at first, but eventually it will become smooth.
Spoon a bit of the pastry cream into each shell. Spread it out evenly, using a spatula. 
Begin placing the fruit on top of the pastry cream. Start with some of the blueberries, then a few of the raspberries, followed by some of the strawberries. Fill in any holes with blueberries to ensure the entire surface is covered.
Once all of the tarts are filled with fruit, set them aside while you prepare the glaze.


Step 7: Apricot Glaze
Ingredients:
1 cup apricot jam (or jelly)
2 tbsp water
To prepare the glaze, place the apricot jam into a small pot, add the water and stir to combine. Bring it to a boil and then strain to remove any pieces of apricot. Straining the jam makes it easier to brush on and it also gives the finished tarts a more refined look.
Place the strained syrup back into a clean pot. When ready to glaze, bring it back to a quick boil, as hot glaze also makes it easier to achieve a thin coat. Once hot, remove from the heat and begin glazing the tarts.

Step 8: Finishing Up
To finish the tarts, gently brush on the glaze, making sure they are evenly coated. Aside from making the tart look nice and shiny, the glaze helps to hold the fruit intact and protect it longer from the air.
Once done, remove the ring so the jam doesn’t firm up and stick to it. Just gently pop it out from underneath. Also, be sure to remove the bottom of the tart pan.
As you’re applying the glaze, it may thicken as it cools, which will make it harder to apply. Simply place it back onto the heat and add a touch more water to thin it out. Basically, it should be thin enough and hot enough to easily coat the fruit.
Once done, refrigerate the tarts for at least 2 hours to give the pastry cream time to set. This is especially important if you are making a larger tart that will need to be cut into portions. These tarts will keep until the next day, and even the following day; however it’s best to make them and serve them on the same day for optimum freshness.

Tuesday, October 4, 2011

Baked Crab Rangoon with Sweet and Sour Dipping Sauce

I have always loved Crab Rangoon but always assumed, because of their simple delectableness, that they would be difficult to make. However this recipe was surprisingly simplistic and the finished product tasted superb. And the best part about this recipe is that there is no frying involved! I would tell you that this recipe serves 6, 2 crab rangoons per person, however I made 6 tonight and “accidentally” ate all of them. So I will put it this way, this recipe makes 12 crab rangoon.


Crab Rangoon
Ingredients
1 can (6 oz.) high quality white crabmeat, drained
4 oz. reduced fat cream cheese
2 tablespoons light mayonnaise

½ teaspoon Sriracha
hot chili sauce
2 teaspoons finely sliced chives, plus more for garnish

fresh ground pepper to taste

12 won ton wrappers
Directions
Preheat oven to 350°F. Spray a muffin tin with nonstick cooking spray.
 In a bowl, mix together crab meat, cream cheese, mayonnaise, Sriracha, chives, and pepper.  Place 1 won ton wrapper in each 12 mini muffin cups. Fill the center of each won ton cup with crab mixture and fold sides up. Bake 15 to 20 minutes or until edges of cups are golden brown and filling is heated through. Garnish with reserved chives.

While your crab rangoon are baking you can make the sweet and sour dipping sauce.

Sweet and Sour Sauce
Ingredients
1 cup sugar 
3/4 cup white wine vinegar 
1/2 cup plus 2 tablespoons water 
3/4 cup pineapple juice 
1 1/2 tablespoons cornstarch 
1/2 teaspoon red food coloring 

In a small saucepan, combine the sugar, vinegar, 1/2 cup water and pineapple juice. Bring to a boil and simmer, stirring, until sugar dissolves. 

Blend the cornstarch with the remaining 2 tablespoons of water. Bring the pineapple juice mixture to a boil again, and stir the cornstarch mixture into the sauce, stirring a few moments until thickened. 

Stir in the food coloring, remove from the heat, and serve alongside the crab rangoon.

*This recipe was a compilation of recipes found on pinterest, my new inspiration for recipes, and general web searches.

Thursday, September 22, 2011

Vegetable Fried Rice

Are you looking for the perfect complement for "Asian Night"? If yes, then this dish is the perfect addition. This fried rice serves 4.

Ingredients
4 tablespoons peanut oil 
1/2 white onion, diced
Salt and pepper
2 garlic cloves, finely chopped
2 tsp fresh ginger, peeled and finely chopped
2 green onions, chopped 
1 cup corn, peas, and carrot frozen medley 
2 eggs, lightly beaten
2 cups white, long-grain rice
1/2 tablespoon soy sauce

Cook rice according to package directions. Set aside. Heat a nonstick skillet over medium high heat. When hot add 1 tablespoon of oil. Add the onions to the pan, season with salt and pepper, and cook for 2 minutes.  Add the garlic, ginger, and green onions and cook for 30 seconds.  Add the frozen vegetables. Cook until just defrosted. Transfer contents of the skillet to a large bowl.
Return the pan to the heat and add 1 more tablespoon of oil. Add the eggs and season with salt and pepper. Stir the eggs constantly and cook until almost set but still moist, then transfer eggs to the bowl. Stir mixture together, breaking up the eggs. 

Return the pan to the heat and add 2 tablespoons of oil. Add the rice to the pan and use a spoon to break up any clumps. Season with salt and pepper and cook the rice to coat evenly with oil. Stop stirring, and then let the rice cook undisturbed until it gets slightly crispy, 2 minutes. Stir the rice again, breaking up any new clumps. Transfer to the bowl. Stir all the ingredients together with the rice, taste and adjust the seasoning with salt and pepper, if necessary. Drizzle with soy sauce. Enjoy!

Recipe derived in part from the Food Network. 

Wednesday, September 21, 2011

French Toast Muffins

1/3 cup melted butter
1/2 cup sugar
1 egg 
1 1/2 cup flour
1 1/2 tsp. baking powder
1/2 tsp. salt
1/4 tsp. nutmeg
1/2 cup whole milk

Topping
1/2 cup sugar
1/2 cup melted butter
1 tsp. cinnamon

Preheat oven to 350 degrees. In a medium bowl, sift together all dry ingredients. Add wet ingredients and stir until combined. Scoop batter into greased muffin tin. Bake for 20 minutes, or until the muffins just start to turn a bit golden at the edges. For the topping, mix sugar and cinnamon in a small bowl. Place melted butter in another small bowl. Dip the warm muffins in melted butter, then in cinnamon sugar. Enjoy!

Pear, Blue Cheese, and Walnut Salad

I found this glorious salad on pinterest, my new favorite website for discovering new and interesting 
recipes. And let me tell you, it was fantastic. The best part about it was the simplicity.

Ingredients
4 tbs extra virgin olive oil
2 tbs red wine vinegar
1 tbs plus 1 tsp maple syrup
½ tsp Dijon mustard
Arugula
Blue Cheese
1 pear
Walnuts

                        Preheat oven to 350 degrees. Whisk together the first 4 ingredients to make the maple vinaigrette. Roast the walnuts for around 8 minutes or until cooked to perfection.  Peel the pear and cut into slices. Arrange salad plates with arugula, blue cheese, walnuts, and pear slices. Drizzle with vinaigrette and enjoy!

Sunday, September 18, 2011

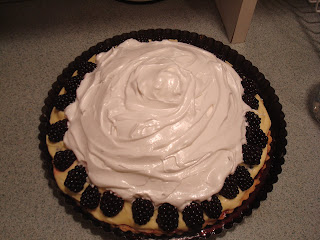
Blackberry & Lime Meringue Pie


I recently made this pie for a dinner party and it was a success. Although I must admit it is time consuming but is well worth it!! This pie would be a great addition to Thanksgiving Dinner. 

Special Cooking Items
Pie Weights (Can use dry beans as a replacement)
Pie Pan ( I like the ones that have removable bottoms)

Ingredients
Pie Crust
3 1/2 cups all purpose flour
2 sticks chilled unsalted butter, cut into slices
1/4 cup vegetable shortening
1 tablespoon plus 1 tsp. sugar
1 tablespoon kosher salt
Lime Curd
1 cup fresh lime juice
3 large eggs
3 large egg yolks
3/4 cup sugar
1 stick unsalted butter, room temperature
1/2 teaspoon unflavored gelatin
3/4 cup chilled heavy cream
Blackberry Compote
1 cup fruity red wine, such as Shiraz or Cabernet Sauvignon
1/2 cup sugar
3 cups blackberries
Meringue 
3 large egg whites, room temperature
1 cup sugar
2 tablespoons corn syrup
1/8 teaspoon kosher salt
1 cup blackberries 

Preparation 
Pie Crust- Process flour, butter, vegetable shortening, sugar, and salt in a food processor until butter resembles tiny pebbles, about 25 seconds. Transfer to a large bowl. Gradually add 3/4 cup ice water, using a fork to stir until dough is a mixture of clumpy wet pieces and sandier pieces, adding more water by tablespoonfuls if dry. Press plastic wrap over surface of dough. Chill in the bowl at least 1 hour or over night.

Divide dough in half. Flatten each half into a disk. On a lightly  floured surface, roll out 1 disk into a 13"-14" round. Roll over rolling pin and transfer to the pie dish. Pick up the edges and
allow dough to slump inside the dish. Fold overhang under and crimp edges. Chill at least 1 hour or overnight.

Preheat oven to 375°. Prick chilled crust in pie dish all over with a fork. Line crust with parchment paper. Fill with dried beans or pie weights. Bake 25 minutes. Remove from oven; lift out paper and weights. Reduce temperature to 350°. Return to oven and bake, using fork to prick any bubbles that have formed and pressing down on them with back of fork, until crust is light golden brown, 20-25 minutes longer. Let crust cool completely.

Lime Curd- Set a strainer over a medium bowl; set aside. Stir lime juice, eggs, egg yolks, and sugar together in another medium bowl. Set bowl over a large saucepan of gently simmering water (do not allow bottom of bowl to touch water). Whisk until mixture has thickened, the whisk leaves a path when lifted from curd, and an instant-read thermometer registers 175°, about 15 minutes. Add butter to curd, one Tbsp. at a time, whisking to blend between additions. Strain curd into prepared bowl. Press plastic wrap directly onto surface of curd. Chill until cold, about 2 hours. DO AHEAD Can be made 2 days ahead. Refrigerate curd.
Sprinkle gelatin over 2 Tbsp. water in a small bowl; let stand until gelatin is soft, about 10 minutes. Using an electric mixer, beat cream until soft peaks form. Add gelatin mixture; continue beating cream until just before firm peaks form. Fold whipped cream into lime curd. Cover; chill.


Blackberry Compote- Bring red wine, sugar, and 1/2 cup water to a simmer in a medium saucepan over high heat; reduce heat to medium and simmer until reduced to 1/2 cup, 20-25 minutes. Let cool. Add 3 cups berries; fold gently to coat.

Spread compote in an even layer over baked crust. Spoon lime curd over berries, smooth top, and chill for 1 hour.


Meringue- Preheat oven to 450°. Place egg whites in the bowl and mix whites with a mixer until soft peaks form. Set aside. Stir sugar, corn syrup, and 1/4 cup water in a medium saucepan over medium-low heat until sugar dissolves. Attach a candy thermometer to side of pan. Increase heat to medium-high and boil without stirring, occasionally swirling pan and brushing down sides of pan with a wet pastry brush, until thermometer registers 238°, 6-8 minutes. Remove pan from heat.

Meanwhile, beat whites with mixer until soft peaks form. Mix in salt.

Slowly pour hot sugar syrup down side of bowl into whites and beat until meringue is firm and glossy. Continue mixing until cool, about 4 minutes. Spoon meringue over lime curd, leaving a 1" plain border, and sculpt decoratively. Tuck 1 cup berries in and around meringue.

Bake pie until meringue is toasted in spots, 3-5 minutes. Chill for 30 minutes before serving. Do Ahead: Pie can be made 3 hours ahead. Keep chilled. Enjoy!


 Recipe was derived from Bon Appetit.

    Wednesday, September 14, 2011

    Slow Cooker Orange Chicken


    Ingredients
    6 boneless/skinless chicken thighs
    1/2 cup orange juice 
    1/2 cup orange marmalade 
    1/4 cup soy sauce 
    1 clove garlic, minced 
    2 Tablespoons ketchup 
    Flour 


    Remove any fat from chicken thighs and roll each in flour until well coated. Set chicken thighs in the bottom of the slow cooker. Combine orange juice, marmalade, soy sauce, garlic and ketchup in a small bowl. Stir until well blended. Pour sauce over chicken thighs. Cook  on low setting for 4 hours. Remove the thighs from the slow cooker. Serve dish alongside fried rice. Enjoy!
    Recipe was found on Pinterest.

    Monday, September 12, 2011

    Pumpkin Cookies with Cream Cheese Frosting


    Ingredients

    For the cookies:

    • 1 cup sugar
    • 2 sticks unsalted butter, at room temperature 
    • 2 tablespoons maple syrup 
    • 2 eggs
    • 1 cup canned pumpkin
    • 1 1/2 teaspoons ground cinnamon
    • 1/2 teaspoon ground all spice
    • 1/4 teaspoon freshly grated nutmeg
    • Pinch of cloves
    • 2 1/2 cups flour
    • 2 teaspoons baking powder
    • Pinch of salt

    For the frosting:

    • 1 (8-ounce) package cream cheese 
    • 1/2 cup powdered sugar
    • 1/8 cup whole milk
    • 1/2 tablespoon vanilla extract 
    • Zest of 1/2 lemon
    Preheat the oven to 350 degrees. Combine sugar and butter and mix with a mixer. Mix in the maple syrup and eggs. Mix in the pumpkin. In a separate bowl, sift together flour, baking powder, salt, cinnamon, allspice, nutmeg, and cloves. Add the dry ingredients into the cookie mix. Drop rounded tablespoons onto ungreased cookie sheet. Bake cookies for 12 minutes. To make the frosting, mix the cream cheese with a mixer. Mix in the powdered sugar. Mix in the milk and vanilla.  Fold in the lemon zest.   Once the cookies are cool, ice with frosting and sprinkle with a bit of cinnamon. Enjoy!
    Recipe was derived in part from the Food Network. 

    Sunday, September 11, 2011

    Slow Cooker Potato Soup

    When the leaves start to turn colors and fall is in the air my thoughts turn to slow cooker recipes. What a great way to make a delicious meal while you are away at work. This potato soup is a super easy, tasty fall dish that will sure to be a favorite. 


    Ingredients:

    Salt and Pepper
    32 oz frozen diced potatoes, thawed
    1/2 cup frozen chopped onion, thawed
    1/2 cup diced celery
    32 oz chicken broth
    1 cup water
    3 1/2 tablespoons flour
    1 cup whole milk
    2 cups shredded sharp cheddar cheese
    real bacon pieces
    4 green onions, chopped 
    In slow cooker stir in potatoes, onion, celery, broth and water. Cover slow cooker and cook on low heat setting for 6 hours. Whisk together flour and milk into a bowl and mix into slow cooker. Increase the heat setting to high. Cover slow cooker and cook for an additional 30 minutes. Stir in the cheese and continue stirring until melted. (If you would like the soup to be thicker, mix together a bit of water and flour and pour into slow cooker until the desired consistency is achieved). Season with salt and pepper. Garnish with bacon pieces and chives. Enjoy.